Let’s Get Crafty!
Welcome to my crafts and art gallery. This is a collection of my latest projects, with pictures, tips and tricks, and troubleshooting at every step along the way. I hope that my projects inspire you to flex your creativity muscles and get crafty!
Every artist was first an amateur.
Ralph Waldo Emerson
Latest Posts
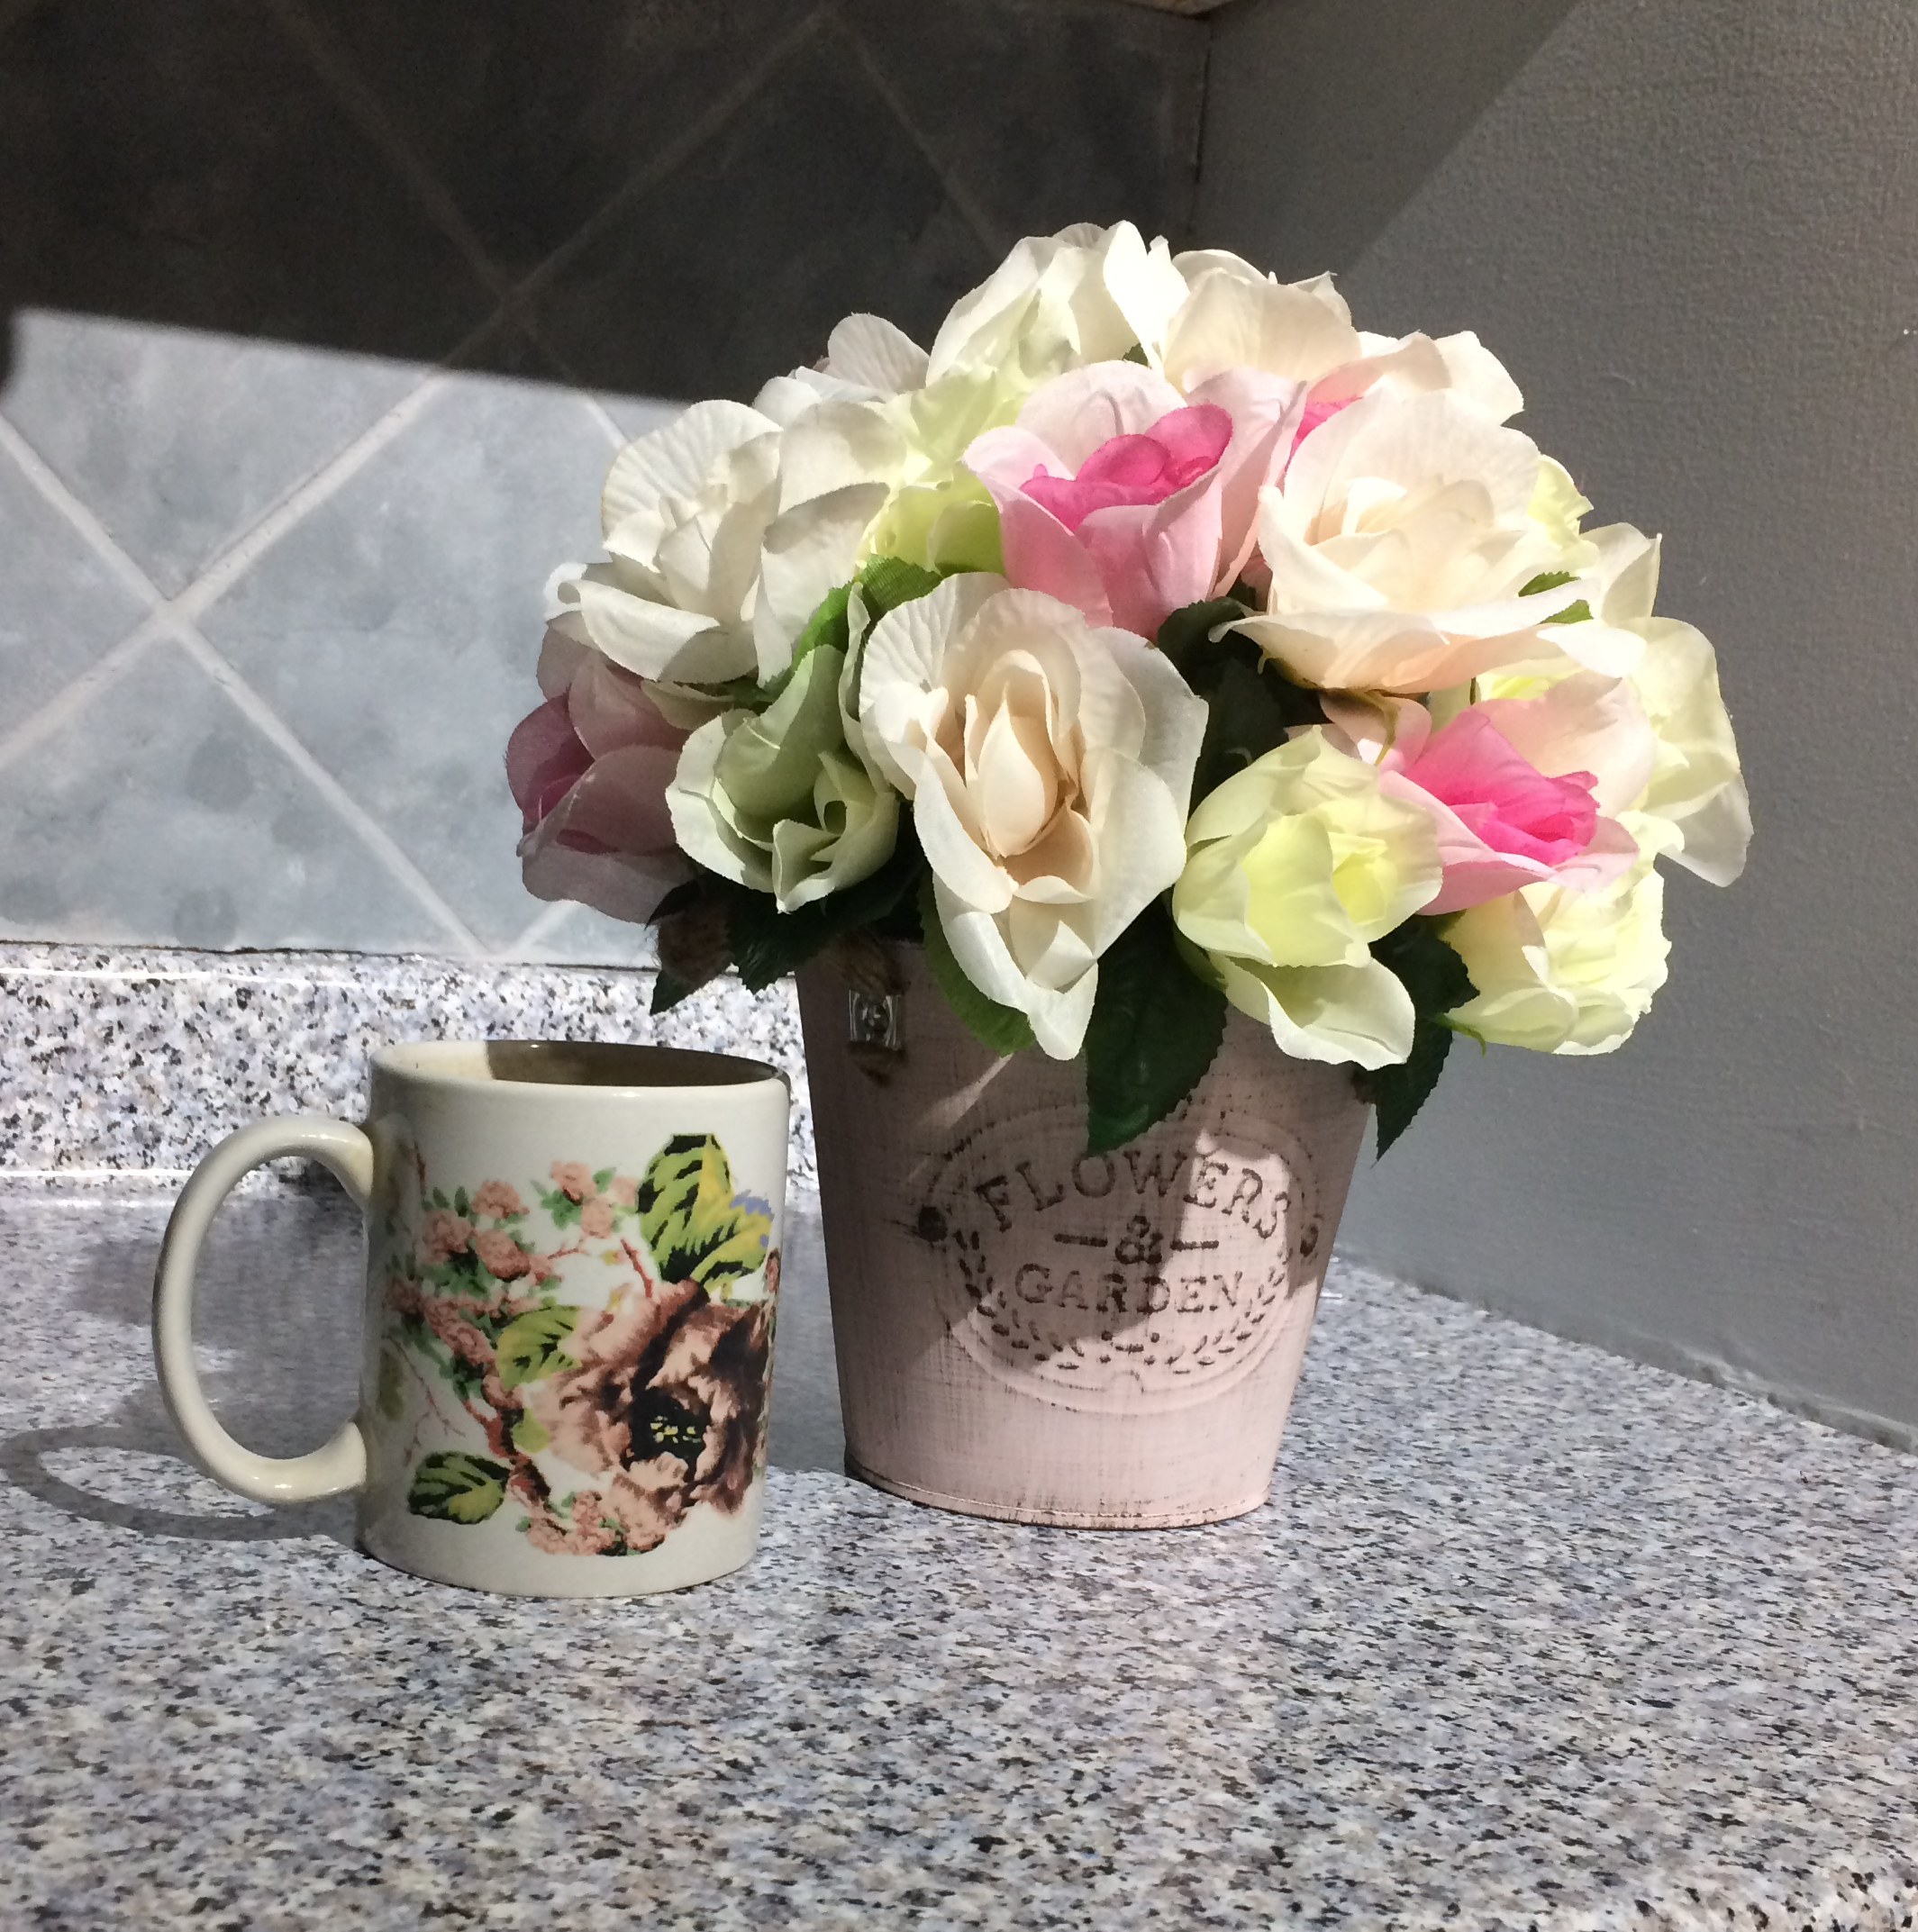
Floral CraftsHappy Spring! Well, almost. Here’s an awesome way to put a bucket of spring flowers together for a table centerpiece or just for a nice pop of color in a room.
Did I mention I did this for less than $10? 🙂
Fancy bucket of roses with my coffee cup for scale 🙂
Ok, so admittedly when I shopped for the supplies for this project I might have picked up a whole bunch of things to figure out what to do with later.
For this project I used a $3 bucket from Dollar General (already painted pink), some Dollar Tree flowers, a chunk of floral foam (also Dollar Tree), and some cardboard I had on hand from a shipping box. On hand I had a pair of scissors, my trusty dusty pliers (with a wire cutter part) and a low temp hot glue gun.
Tools and supplies- I added two more flower bunches in later on.
One of the first things that I do for making a floral arrangement in a shape like this is to push all of the leaves on each stem to right up under the flower. This helps add some depth to the arrangement and fill in some extra space too.
On the left are blooms with the petals raised to under the flower- on the right is how they come in the bunch.
After all of the flowers are cut into single stems and prepped by moving up the leaves, you need to decide which blooms are the largest. Making a balanced arrangement is a lot easier if you place the larger blooms first and then fill in around them. For this project, I cut the stems to approximately 6″ and trimmed the stems shorter as necessary for placement. (This is where the pliers with a wire cutter part really help.)
Next, I began to prep my bucket to hold flowers. If you want, you can hot glue down two blocks of floral foam- but I didn’t want to waste my foam when cardboard would work just fine. I cut out squares from an Amazon shipping box using regular scissors- wide enough so they would fit in the bottom of the bucket.
My cardboard squares cut out from an Amazon shipping box
I fit these squares into the bucket using hot glue, and stacked them so every one was rotated from the one underneath it (see below).
Cardboard squared placed in the bucket
I placed enough cardboard squares so that my foam would end up about half an inch above the bucket. On top of the cardboard I hot glued my floral foam and let it cool and dry. It is quite important to let the hot glue set solid for this since you are going to be poking at it with wire flower stems 🙂
Floral foam in and large flowered stems inserted
As you can see above, I try to orient the large blooms somewhat symmetrically- especially in a round arrangement- so it doesn’t look off balance. After inserting the stems into the foam, I took my next largest flowers, placed those and repeated this process. Where necessary, I trimmed the stems so the flowers could be snugly inserted into the foam.
If you happen to do what I did (you’ll know) and end up with a hole that doesn’t hold the flower stem- do not despair! You can dot the flower stem with a bit of hot glue, hold the neighboring flowers out of the way of the glue, and poke a new similarly placed hole. Also, pro tip- pull off all the hot glue spiderwebs as you go.
The finished flower bucket 🙂
Don’t forget to fluff your flowers and find a nice spot for your new creation 🙂 [...]
RefinishingAdmittedly, I was super super hesitant to cover my countertops in contact paper. I’ve waffled for months on what to do with my countertops- should I make new countertops? Should I get install new laminate ones? Should I keep drooling over the butcher block ones I don’t have a budget for?
I finally decided that I didn’t want to try and replace them myself- mostly because I haven’t really done any plumbing before and I’d have to take out the sink. Perhaps that will happen when I’m feeling more adventurous… anyhow, here’s what I learned about how to apply contact paper to countertops. For those of you who think this is sticking paper to a countertop, it’s not. This wrap is a decently thick plastic- very similar to the wrap that is used on cars.
Surprisingly, even with my sub-par application skills, the end result looks really awesome and the process didn’t take a whole lot of time at all!
The finished countertop 🙂
The finished countertop (above) is a far cry from what I started with as a surface. My countertops not only did not fit with the design I wanted for my kitchen, they were chipped, scratched, worn and otherwise just ucky looking.
The old countertop… a nice sickly green color
After doing a bit of searching online- I saw several posts using dc fix Designfolie contact paper that resulted in really nice countertops. I picked up this https://amzn.to/3r2Y1ge style in the color “granite grey stone” and I also ordered the application kit https://amzn.to/2KgPzZM which I wasn’t particularly keen on buying, and figured I’d return it if I didn’t need it.
Super nice colors with blue undertones
So, about that application kit.
Get the kit. Seriously, that little scraper felty thing is probably the only reason I got the contact paper to sit flat. The razor knife- well they’re like $1 at Harbor Freight, so I dunno, but the felty thing is worth it.
I very quickly learned that I am TERRIBLE at applying contact paper. Like really really bad. The first piece that I applied- I didn’t use the felty thing- and I had to take it off because it was all rumply. I caved and opened the applicator kit.
The next piece I put on- awesome. I cut the paper to about half of the width on the roll to apply it also- I figured starting with a smaller piece would be easier. It absolutely was. I peeled back the backing for about two or so inches, stuck the end to the top edge of the countertop, and smoothed it down with the felty thing. I smoothed in a pattern where I made a christmas tree shape- first the tree trunk down the middle and then a bunch of branches to smooth out any bubbles under the paper. Worked awesome!
I overlapped the next piece two or three inches over the first one- because who really cuts perfect straight lines with this stuff? Not me. With the pattern in the paper- you can’t tell it’s overlapped at all.
Contact paper is on and smoothed out
I was really really happy with the look of my new countertop- and that it wasn’t crumply or bubbly anywhere.
No wrinkles! Just my phone battery powering my tunes 🙂
I’m going to finish my cabinets- and tell you all about how I did those in a future post- and my kitchen will be done! 🙂
Let me know what you think- and check out how to make that cute floral centerpiece (less than $10!) here: https://craftsand.art/2020/12/13/creating-a-10-floral-centerpiece/ [...]

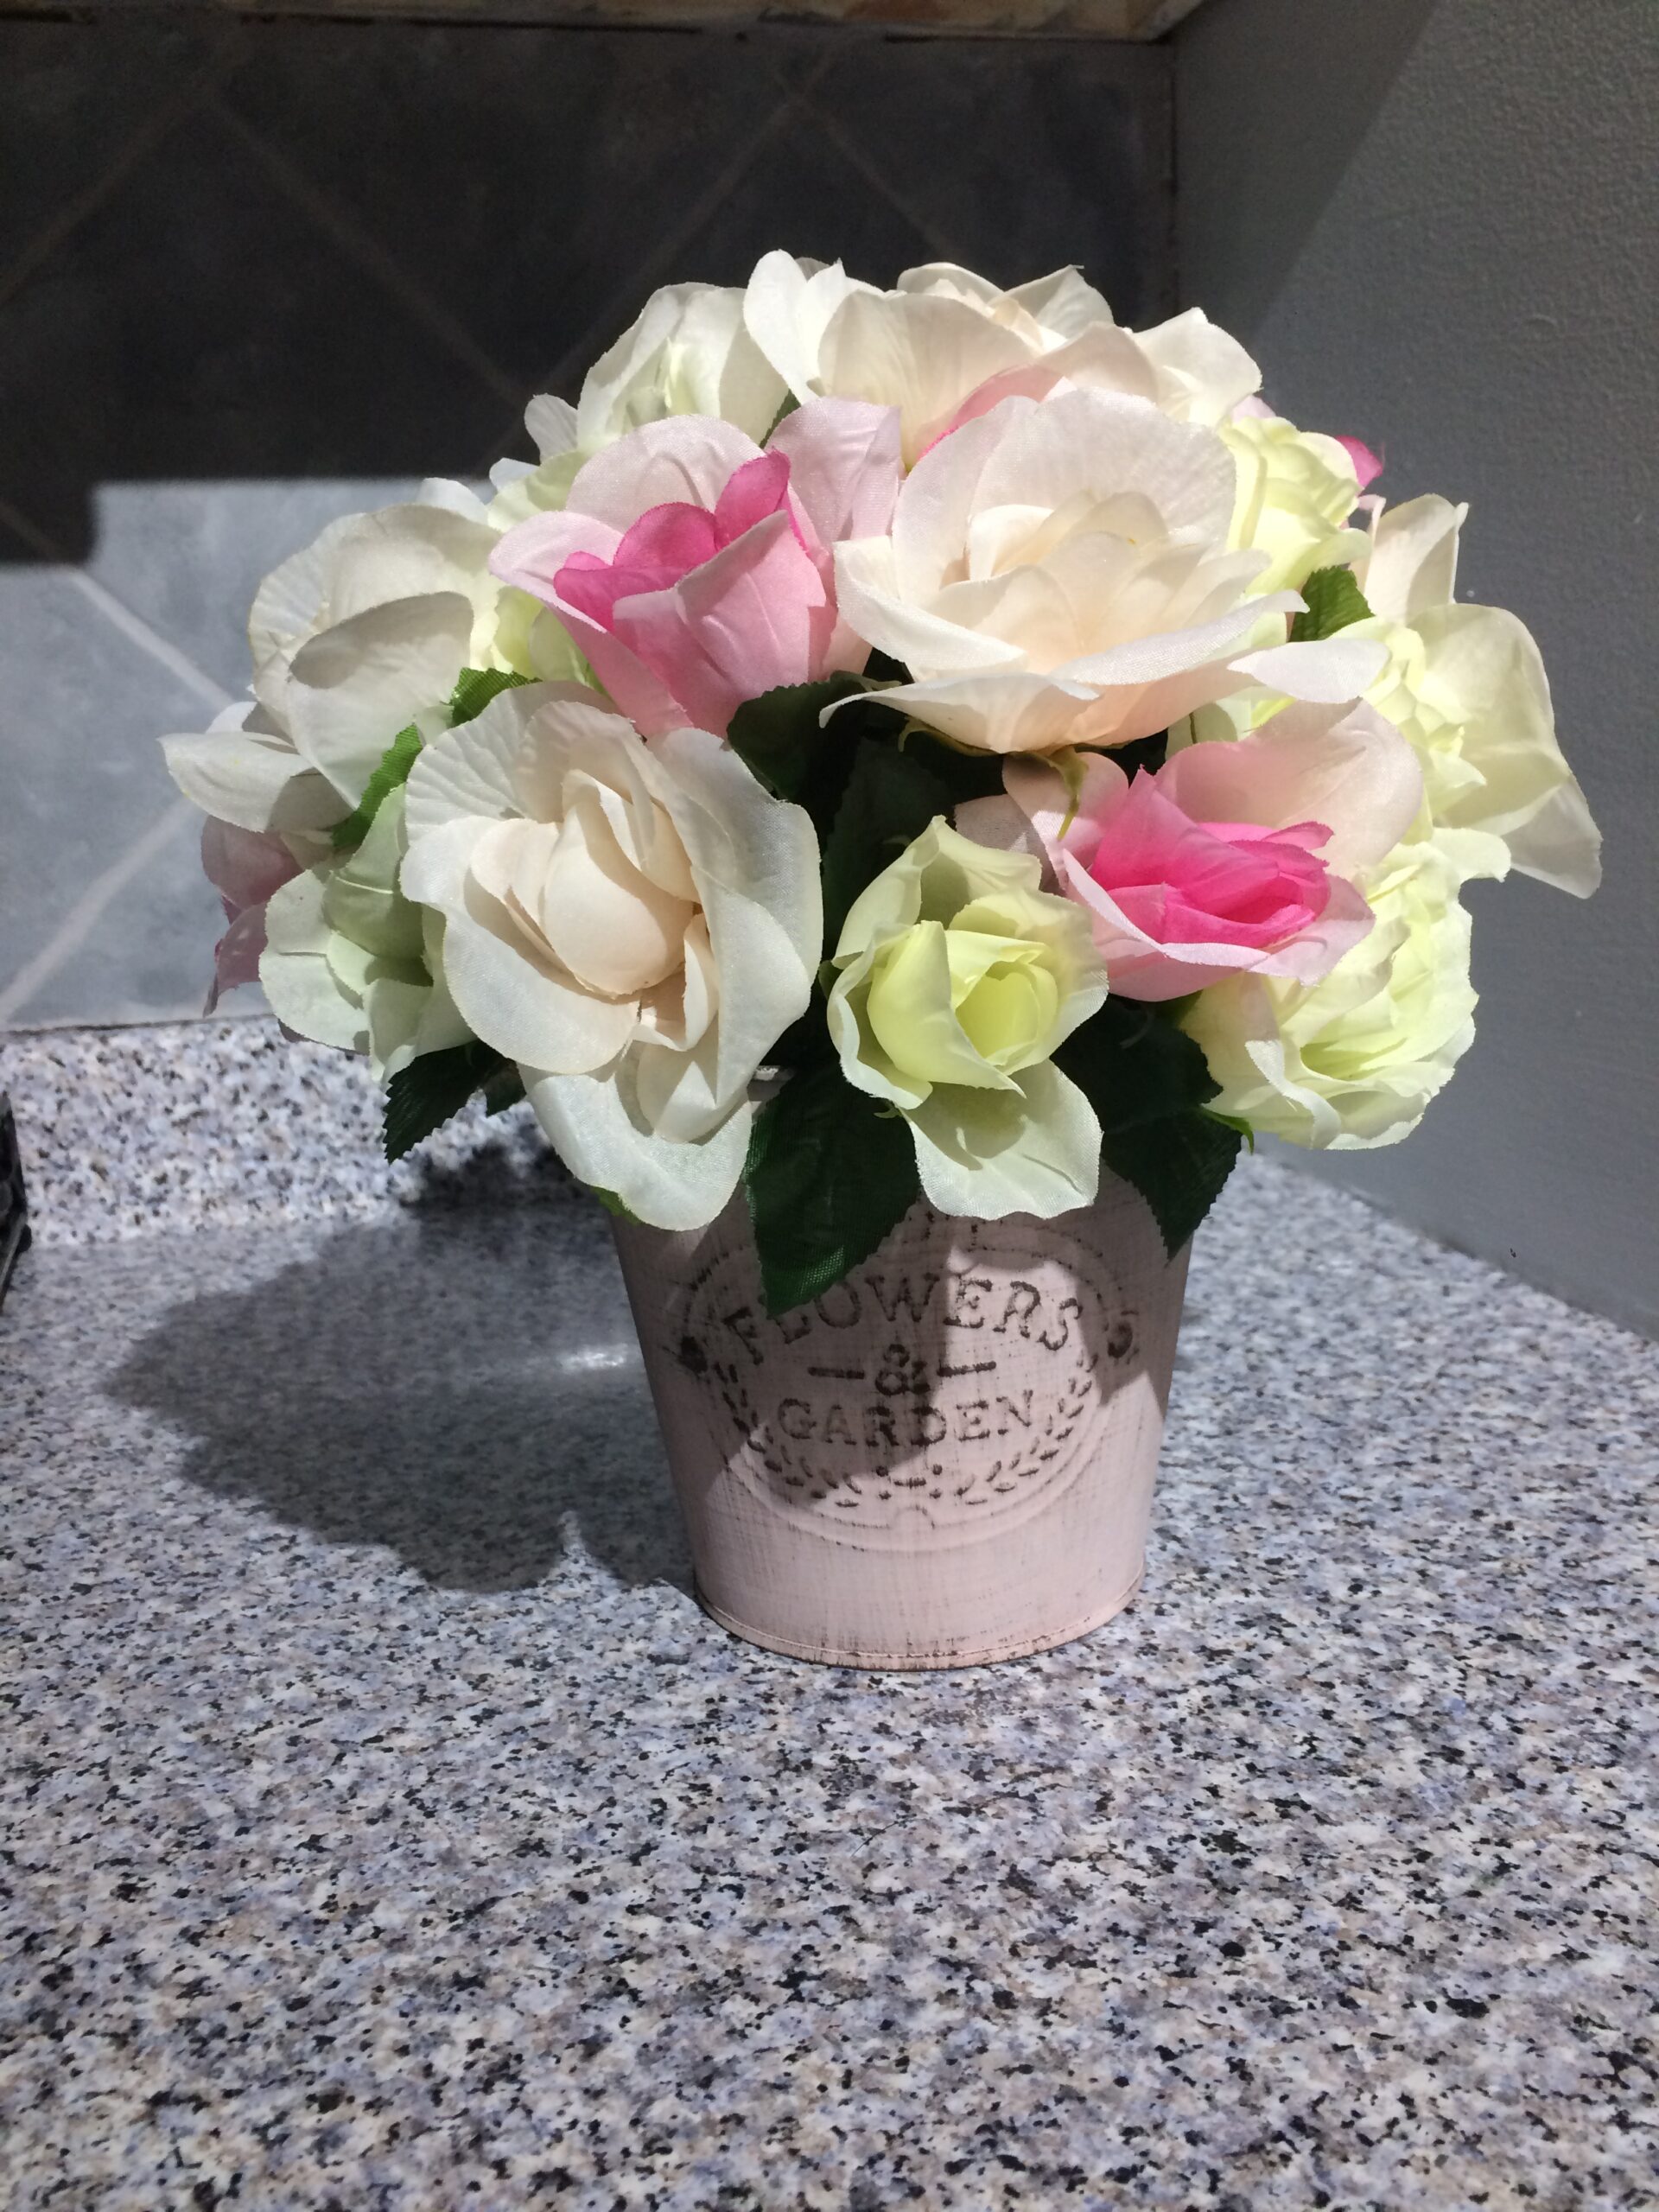
Floral CraftsOk, so admittedly I’ve watched too many videos on how to make centerpieces from Dollar Tree stuff and had to build my own. I had a lot of fun with this- and it’s an adorable centerpiece for roughly a $10 total cost.
The final product
I’m going to walk you through what I did to make this step by step- it was actually super easy. You will need a LOW temp hot glue gun for this project- a high temp gun makes the glue take way too long to cool for this application. Here’s a good option for a reasonably priced glue gun https://amzn.to/3oLpFw7 and you can get your glue sticks anywhere including the Dollar Tree!
After wandering through the Dollar Tree, I came home with a few bunches of flowers, some floral foam and some seemingly random glassware.
My “haul” from the Dollar Tree
Alright, so maybe I bought a few extra things like a picture frame, ribbon, etc. because I really did not know what I was aiming to create 🙂
I started piling the glassware pieces up and trying to determine how I wanted to make a riser for a flower arrangement. The small tea light holders were no match for holding the heavier pieces of glassware, so I set those to the side for a future project. I decided to use the glass plate, the glass bowl, and the glass iridescent candle holder (all from the Dollar Tree).
The three pieces I chose to create the riser
To put the riser together, I used hot glue- and this held really well. I’m not expecting this to be a long-term decoration, but if I was I would have beefed up the connections between the glassware with a two part epoxy meant for glass. I’ve seen others using E6000, but I haven’t bothered with it myself (yet).
The assembled riser
Here’s what the riser looked like assembled. The bowl is upside-down on the bottom. On top of the bowl is the iridescent candle holder, also upside-down. On top of everything is the plate- which I waited to glue down until my flower assembly was complete.
I started my flower assembly by gluing a piece of floral foam (Dollar Tree) to the top of the glass plate.
The beginnings of the floral arrangement
Here you can see the foam is attached to the plate, and I have begun placing flowers into the foam. I cut the flowers off of the bunches (Dollar Tree), leaving enough length on the stem so the flower would touch the edge of the plate after being stuck in the foam. I also pushed the leaves up on the stems of the flowers until they were right under the bloom to give the arrangement a fuller look.
**Side note: The scissors don’t work for this. Grab a pair of pliers with a wire cutter spot in them, or a pair of wire cutters. Life will be easier.
Cut flower stems with the leaves pushed up
I inserted the burgundy flowers into the floral foam symmetrically in a circle around the side of the foam, and placed a few on top of the foam as well. I added some purple flowers in between those, and checked to make sure that the arrangement was coming out round by pulling the blooms out into a round shape.
Building the initial shape of the arrangement
Next, I added in some light pink flowers, keeping with a symmetrical design.
**Side note: The larger the round shape you make, the more flowers you will need to fill out the arrangement.
Adding in some color
I continued to add in flowers until the arrangement became fairly full. For some accent color, I added in a smattering of pansies wherever there were sparse spots.
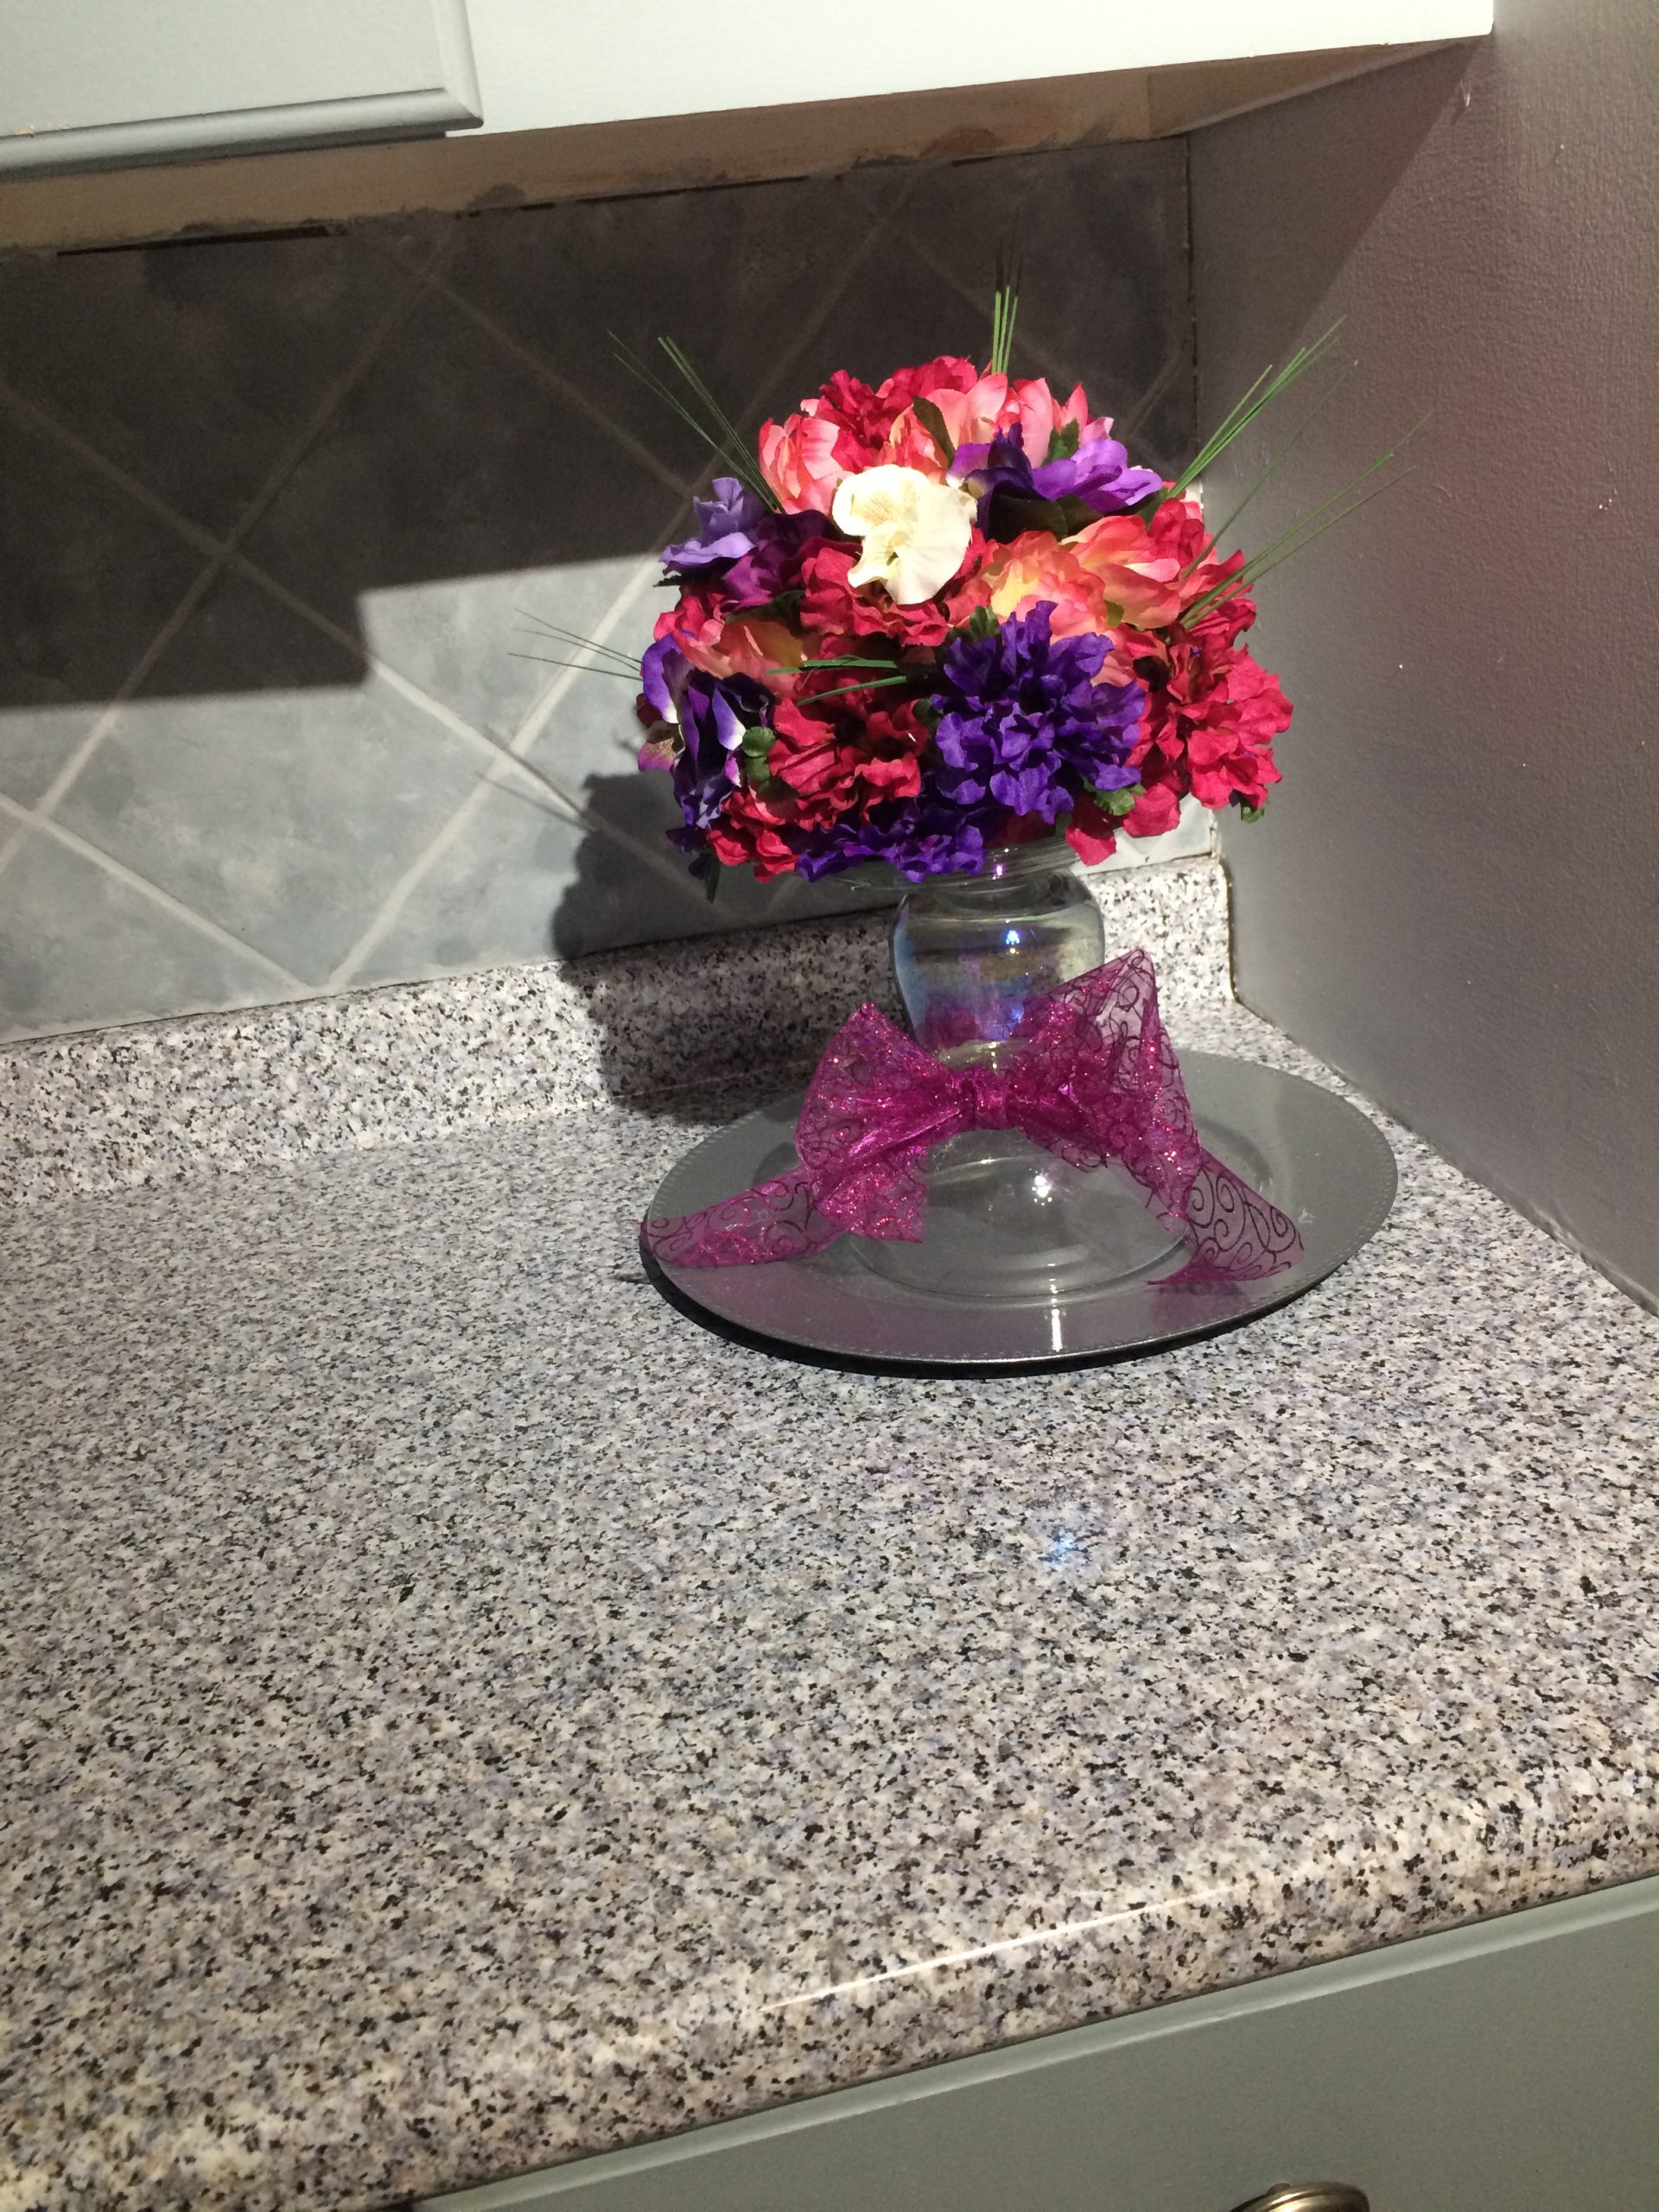
The completed arrangement
Now, it was time for me to put the arrangement on top of the riser I created earlier. For this, I used a generous amount of hot glue (nearly a whole stick). When I put everything all together, the iridescent candle holder and the glass bowl looked like they didn’t belong together, so I twisted up a bunch of this wide ribbon and tied it in a bow around where the candle holder sat on the bowl. I also added in some lengths of grass with hot glue to mimic a bouquet design I found elsewhere online.
Sparkly ribbon and some grass
All in all, this adventure cost me about $10, not counting the glue gun, scissors and wire cutters- for a really nice centerpiece. Let me know what you think 🙂
Completed centerpiece
And oh yeah…. make sure to pull off all the hot glue cobwebs…. lol [...]
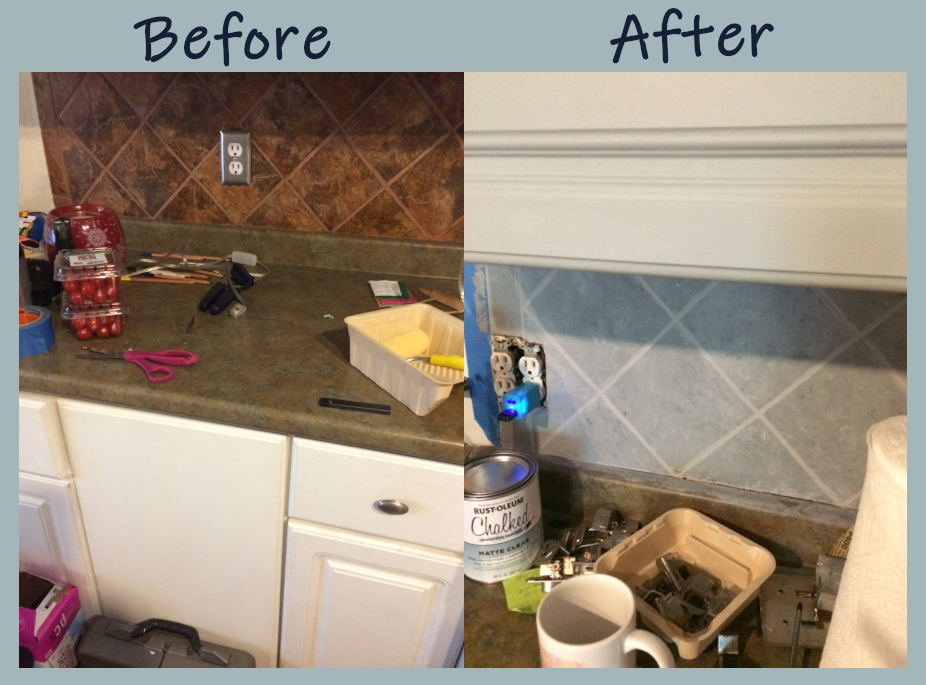
RefinishingI’ve hated the look of my kitchen for so long- and desperately wanted to change it- but money. Ugh. The major blocker for beautiful renovations is always cash flow. Here I’m going to show you PART of my kitchen makeover, for as cheap as cheap is. I will update things as I finish them 🙂
The before and after of my tile backsplash. From ooof to ahhhhh.
Alrighty, so as you can see on the left up there my “before” kitchen really wasn’t coordinated much and was a bit too tuscan vineyard for my tastes. This kitchen hasn’t seen a nice update since the style on the left was installed a few decades ago. Ordinarily, a kitchen remodel is a huge investment of time and money- both of which I have very little of. So, after watching a few hundred DIY videos and browsing techniques, I decided to try something a little off the wall.
I chalk painted my tile backsplash.
Yup, I did that. And here’s how it went:
Old kitchen backsplash and a sneak peek at the new color of my cabinets! 🙂
I realistically should have started out by taping off the countertops, etc. so my backsplash painting stayed on the backsplash. I am rehabbing the countertops though, so I didn’t give that much mind.
The first thing I tried was to see if chalk paint even stuck to tile. I’d heard chalk paint sticks to just about anything, so I tried it out with a Rustoleum chalk paint in Grey. Not too exciting, but enough to cover the terracotta goodness that was my former backsplash and cover it well.
Goodbye terracotta goodness!
I did two coats of the Rustoleum chalk paint in Grey before moving on to the exciting part. I chose Behr Chalk Paint in color “Gingham” for my cabinets (post coming soon!) and used this color to accent my tile.
Popping in some accent colors!
So you’re probably wondering where all of those colors came from. In order to create this finish, I actually chopped up an CLEAN old car wash sponge (the kind with the big holes in it) and applied the paint with a piece of sponge. If your budget allows, they do make sponges for painting, and they may or may not be better- your call.
I took my sponge piece and dipped one corner in the Rustoleum grey chalk paint and the other corner in the Behr Gingham. I tapped off the sponge onto a plate so I didn’t apply gobs of paint at one time. To make the blue stone like pattern, I dabbed the sponge onto the backsplash and rotated it as I went- not following in lines and wandering a bit. Yes, I did get paint all over the grout lines- it was easier for me to go back in after the tiles dried and do the grout lines in the grey with a small paint brush.
A new backsplash!
This backsplash was the very start of my kitchen makeover, and I am working on a whole lot more. I will share my kitchen makeover in stages- so far I did the backsplash at least 6 months ago at the time of this post and it’s still looking really nice with no scratching, chipping, anything really. Interestingly, I did not seal the backsplash. Yup, you heard that correctly- I did not seal it. Retrospectively, I probably should have? Eh. Hm. Anyway, if I was going to seal it- I would use a matte spray finish poly topcoat or something along those lines. The clear gloss you see above I used for sealing my cabinets…. pics to come 🙂
Oh, yeah- and the price check on this little refresh was about $30 in paint. My garage storage already owned the sponge. [...]

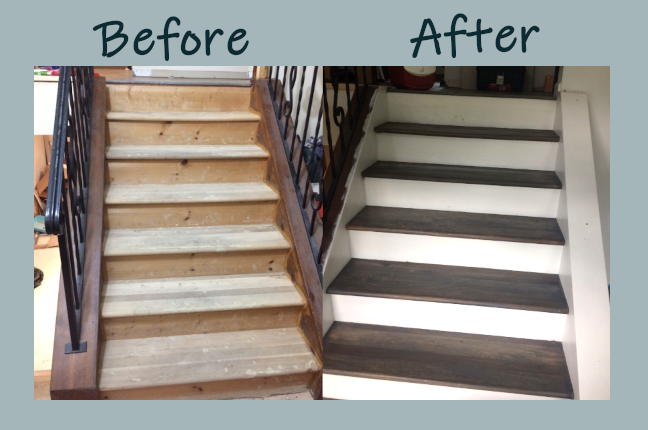
RefinishingHow many of you have ripped up the carpet on your stairs only to find unhappy dirty pine stair treads underneath? Was your first thought “We need to replace those?”
Here’s a fun way to turn ordinary pine stair treads into a new gorgeous set of stairs- all for less than $100 in materials. This project took me a total of around four working days time- but I split it up and worked a few hours a day over a period of a few weeks and moved kind of slow. It’s very likely that this project can be finished faster using larger time chunks.
So here’s what the stairs looked like after the carpet came off and the carpet tack strips were removed:
The “before” of the stairs
The stair treads were well… ooof. You can see that there are nails, holes, divots, and well the pine was just worn.
On to the challenge! The first thing that I did was give the stairs a rough sanding with 80 grit using my random orbital sander (like this one: https://amzn.to/3llo7Xu). I use a corded sander because it seems a bit lighter to deal with. To get in the corners, I used a oscillating tool with a sander attachment (like this one: https://amzn.to/2JauG2o). And no, I’m not sponsored by Dewalt or anything, these just happen to be what I own. Other brands should work just as well- but use your judgement with the cheapies. Side note- If you need a tool and buy through the links I provide I may get a small commission which will help fund more projects. 🙂
Alright, so I sanded the stairs with 80 grit. Gotcha. This was actually super helpful, because then I was able to see the zillions of little holes left by the carpet strips and all of the nicks and divots in the stairs (sigh). I filled all the holes with a basic wood putty- however– I definitely should have used the sawdust mix I’ve used in the past of one part sawdust to one part wood glue to get a more tintable finished product. The wood putty claimed to be stainable but nooooooo it wasn’t. More on that later on.
Here’s what the stairs looked like after 2 rounds of filling and sanding:
So many holes!!!
Next I started stain application. I first used Minwax Grey wood stain (https://amzn.to/2KGaHJ1) and that’s when I learned that the wood putty I had used did not take stain. My stairs looked like reverse leopard spots since I had used so much filler- it was kind of awful. Not to despair! I was going for a bit of a worn look anyhow, so I switched to a grey gel stain and darkened it by mixing a 9:1 ratio of gel stain to black acrylic paint. I dry brushed the darkened gel stain over the stairs- trying to camouflage the putty spots.
Very few putty spots visible after the darkened gel stain 🙂
I let things dry, and did a second coat of the darkened gel stain, covering 99% of the putty spots and called that good. I left the stairs to fully dry, I would recommend at least overnight before applying poly. I used two coats of Minwax water based poly (https://amzn.to/3lqP38A) but would recommend an extra coat or two on top of that for high traffic areas.
After finishing the stair treads, I taped off the treads and painted everything else a crisp white. I heartily recommend using a primer first- especially if the areas you are painting were stained previously- or any blemishes or stains will show through your paint.
Here’s how it turned out! 🙂
Restored stair treads look awesome! [...]
Woodworking ProjectsIn the newfound work-from-home era, I quickly realized that I needed a nice desk space to work from. My goal was to create a desk large enough for my home office to fit two computer setups comfortably.
Here’s a glimpse at the finished product:
Closeup of the end product
Alright, well let’s get crafty!
To make my custom desk, I started out at my local big box home supply store and picked up:
Five 1″x6″x8′ common pine boardsTwo 1″x4″x8′ common pine boards
I think the whole thing came out to like $50 for the lumber. I went for the cheap stuff. The turnover on the cheap stuff is usually faster at the lumber departments near me, so I didn’t have a whole lot of trouble picking the nicest straight boards I could find.
And yes, with the back seats down it is possible to fit 8′ long boards into a passenger car.
So I might have gotten some extra lumber… 😉 Other projects to come.
On to the project!
Since I bought 8′ lumber, and I wanted an 8′ desk, I didn’t need to cut any pieces for the long boards. I did cut the 1″x4″ with my miter saw to make 4 pieces that were 28″ long and one piece that was ~60″ long for a cross support, angled at 45 on each end (see image). The cross support helps a desk that is this long from being bouncy. Although I did this with a miter saw, it can also be done with a handsaw and some grit and determination.
First, to transform my lumber into a desk I used a finish nail gun with 1/2″ finishing nails. (this one by Ryobi is pretty awesome because it doesn’t need a compressor: https://amzn.to/3mjSoY2) I lined up the 5 long 1″x6″ boards, and shoved them together to mark where I wanted to put my 28″ long 1×4’s. The outer 1×4’s are about 8″ in from either end, and I placed the inner set to match up with each other to make the “z” on top of the long boards. I wasn’t too particular about placement, since this was the bottom of the desk after all. I used my finishing nailer to anchor one inner 1×4″ to the line of long boards, pressing the long boards together as I went. Since I had taken the time to choose the straightest lumber possible and laid the boards out so they met up well, I didn’t have too many problems. After anchoring down one inner 1×4″, I anchored the other inner 1×4″, followed by the outer 1x4s and then the center cross board. Phew! Desk built…. almost. Finishing nails aren’t strong enough to hold a desk like this together on their own, so I followed up with 1 and 1/2″ screws (check out the awesome pattern below).
The assembled desk!
I was pretty excited that I had built a thing. It was super. So excited in fact that I immediately stained the bottom of the desk. I did not use a wood conditioner for this (too much excitement)- I rubbed the stain on with a clean old cloth and rubbed it off after a few minutes. I used the Varathane Kona stain (found here: https://amzn.to/3fI5FHy) and I was stoked at the awesome brown color- especially since it didn’t have any weird redness some of the other brown stains have. In the pic above, the end is wiped off and ready to go, the dark inner piece has already been stained, and the natural wood is also showing for comparison.
The bottom fully stained
Yes, you’re probably saying “WOW she didn’t even sand it before she stained it!” and yeah, for the bottom of the desk you’d be correct. I really was that excited. For the top of the desk, on the other hand, I did sand things down to baby smooth using my handheld random orbital sander (like this one: https://amzn.to/2Jlp4C7) which saved me a whole lot of time. I started with 80 grit sanding discs, and quickly realized that I’d need some filler to make everything ok.
Pro tip for filler: I used sawdust from my sander’s collection bag and mixed it on a plate with regular old wood glue and Kona stain so it would be the same color as my finished product. I’d recommend using gloves for this- my fingers were gross for days.
Sanded down and rounded edges
After filling, I let my homemade filler dry. Then I sanded again using my handheld orbital sander using one pass over all surfaces with 80 grit, 110 grit and 220 grit. I also ran the sander down the sides of the desk and lightly down all corners for a softer look. Side note- I’m a big fan of the Diablo sanding discs, but something like these https://amzn.to/3fNzeHu would work fine too.
Filled and sanded
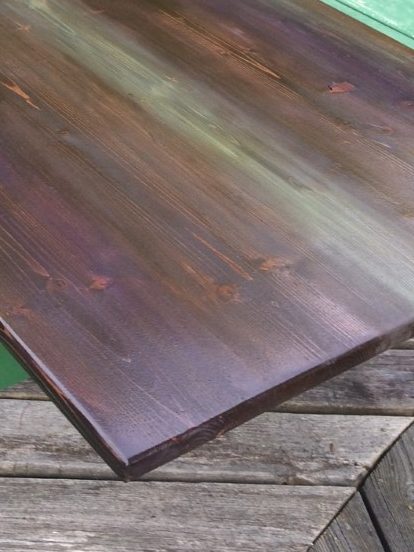
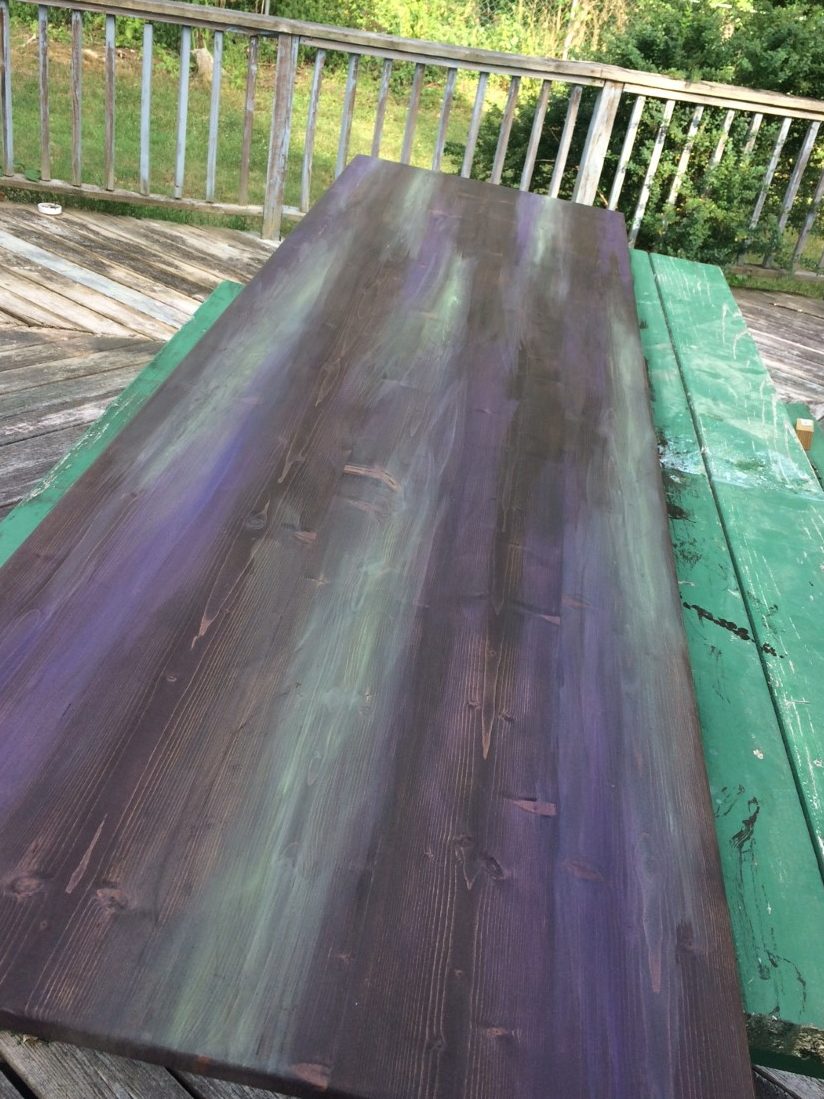
Alright! Ready for some color!!!! I stained the entire piece Kona brown by wiping on the stain with a rag and then wiping it off after a few minutes. I didn’t leave the stain on very long at all and ended up with a beautiful color.
Kona brown stain
The Kona brown looked lovely, but I wanted something with a bit of a punch of color- so I decided I was going to dry brush on some green and purple. I watered down regular old acrylic paints so they were more water than paint. I think I used DecoArt, but something like this would work great also: https://amzn.to/2HLbHKO. Using a super cheap dry chip brush (similar to this: https://amzn.to/2JhHS5s) I applied the paint in streaks, alternating colors and leaving some plain brown showing.
Lots of color
I wanted a really shiny surface that would be super durable, so I let everything dry and I applied three coats of Watco wipe-on poly (https://amzn.to/3q8TI2k) with a foam brush. I let the poly dry between each coat, and used a fresh foam brush for each coat also.
Suuuper shiny topcoat
I was pretty happy with how the desk top turned out. I fastened some awesome hairpin legs onto the desk that I got off of Etsy (somewhere around $40?) and my desk was ready to go.
Let me know what you think! 🙂 [...]
My Favorite Projects:
My Newest Project: Crafting farmhouse centerpieces for less than $10
Building a Custom Desk
From start to finish
August 2020
Inspiration strikes at the weirdest of times.
Stay up to date on all of my newest ideas and techniques!